1.4 NES Graphic’s Tools
NES Toolbox
Like a plumber, we will need to have different tools to work on our stuff. It’s the base of all, even with good skills, it can’t work without tools.
Time Saving
I will say you even if you know it : Save your data! It’s the main rule for each tools
-> „Saving“ save your time and energy.
„Ctrl+S“ or „Command+S„. Thanks to do it!
I was also agree with this and I save often. But it come a time, when you are in the flow of work, the time is running, you continue to work on your sprites, you find solution and you are on the way to finish your main character’s animation! Hero is going to be alive.
It’s 2 o’clock in the night or maybe 3. Anyway you don’t care, nothing can stop you! You are right, except if your tools break!
And when your Computer/Program will crash, you realize your last save was maybe 3hours before… Breathe, calm…
Restart your computer/software and feel bad, hanging on a new hope, the magic one, „maybe i saved it in last half-hour, i need to check! maybe the program keep a saving version before crash? „. Nope.

Be careful of the zombi-worker mode, it’s nice to work at night, but you can make mistakes, and finally you go to bed at 4 o’clock without result. Nice, isn’t it?
Ctrl+S or Command+S or die
Don’t worry, we will makes always this mistakes. We just need to reduce the frequencies when it’s happen.
FC/NES GFX Planning sheets
Here’s an alternative to make Graphics without the problem that your computer crash 😉
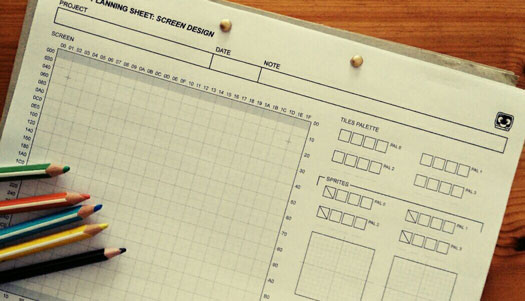
After spending time without PC and also to get often the wish to design fast with pencil, I came to the idea that a version paper of some NES dev tools will be good like Nintendo did with official documents when they were developing Famicom games. I created a document PDF of 3 pages that can help you to do Graphics research in a different way. If you want to sketch fast directly on paper, you have possibility to design the Screen, draw sprites and tiles.
You can download the last version corrected (edit 27/08/2020):
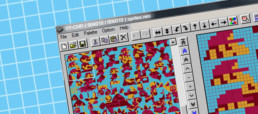
YY-CHR
This tool is simple and you will always use it . People can use it to hack the graphics of a NES games. But we will don’t make this.
You can make all your tiles directly on CHR’s Bank. Like a MS Paint software but for nes. When you will save, it will be directly chr data .
You can download it on RomHacking
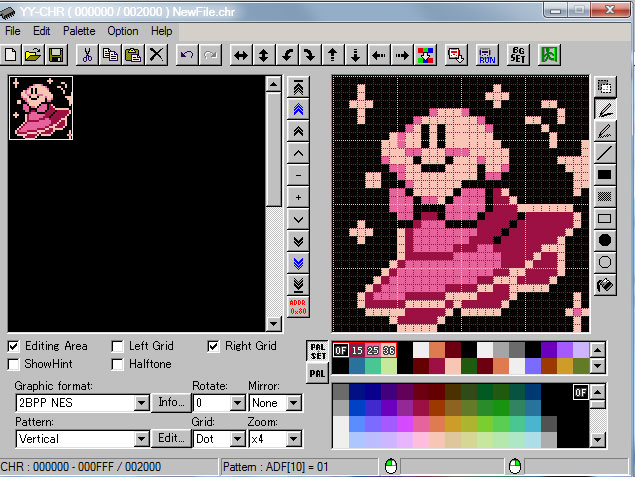
Easy to install it. Open YY-CHR and you will see this.
![]()
- On the left part you can see one part of CHR bank, you can have many when you scroll it but we will work only with two. One for Sprites the other for BG’s element.
- On the right you can see a part of your CHR Bank and this area is the place where we will draw with pixel our tiles.
![]()
Tools
We will see how to set and use it.![]()
- All the tools for moving tiles, to switch the sens, to turn it 90°c or to move from few pixels up, down, left and right. The last tool is for switching colors.
- Here are the basics stuff to select your pixels, to draw. you can use ready-form (Line, Square and Circle). You have the pot to fulfill some area of pixel. You need before to have a area closed with other pixels.
- It is where you can have access to the colors and palettes. First you have two lines with 4palettes each. In the second part down you have the full palette of NES’s colors.
- You can find info about your tiles, for example, to see the hexadecimal value of the tile’s place in the CHR Bank.
- It is also important. On this place you can set how is organized your bank and others things. I like this settings as you can see on the picture. You will use a lot of time the „ZOOM„. So don’t forget where it’s place 🙂
Set colors palette
We need to not forget our 4th BG color. This one need to be on each palette. Better to start with this one, when you know already what it will be. I use the 1st line of palette for Sprites and the 2nd for BG. You can see on the picture the first line start with the first palette with Black (0F), Dark-Pink (15), Medium-Pink(25) and Light-Pink(36).
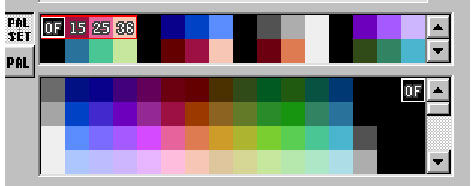
To change the color, you need to select first the color on one of your 8palette and after you select one color on the Full NES’s color palette. Every time you can change your palette. When you are in the research time, it’s nice to set 8palette and watch your sprites ou BG element with different palette. It’s a Tool really easy to use.
Switch colors
When you will import some sprite from another software (Adobe Photoshop), the copy/past will maybe change the pixel color order. You have something to solve this porblem in YY-CHR. This Software’s function is on the top. In the area 1 as i was showing you before.
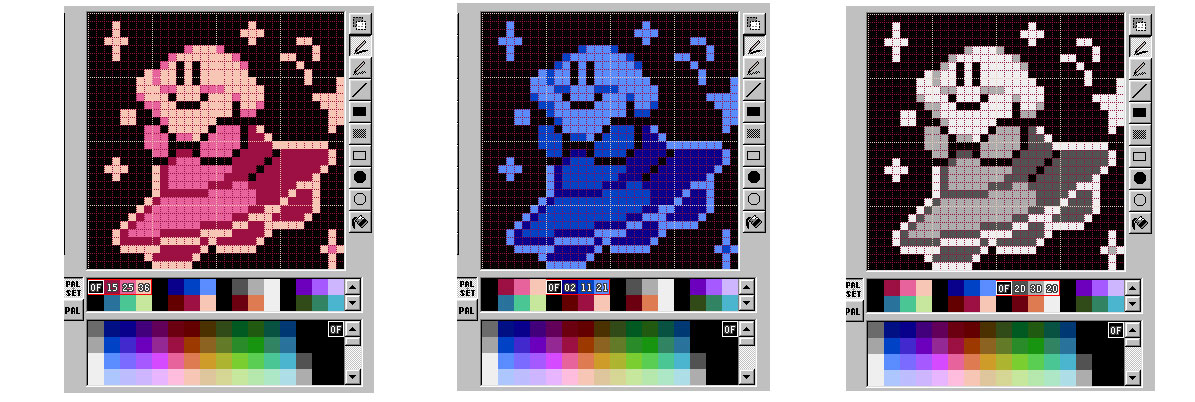
You can have some problem with color when you copy/paste some tiles from another software, for example Adobe Photoshop. All the sprite is good, but color are wrong. You will need to use this tool. I will show you an example with some kirby’s vignette (Better as to write it).
You can see Kirby’s vignette have wrong color. It’s the good palette but the color are not in the correct order. So we will use the tool to switch the pixel’s color between them. To avoid to re-draw with the correct color.
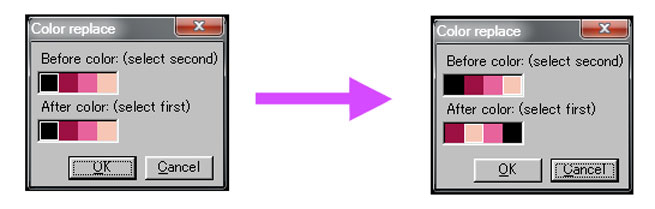
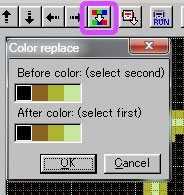
Open this „color replace“, first choose the color down, then the color up you want to replace. When you finish to set your colors, press „OK“. (Many time, we can make mistake, so you can make Ctrl+Z or Command+Z to go back before this transformation.)
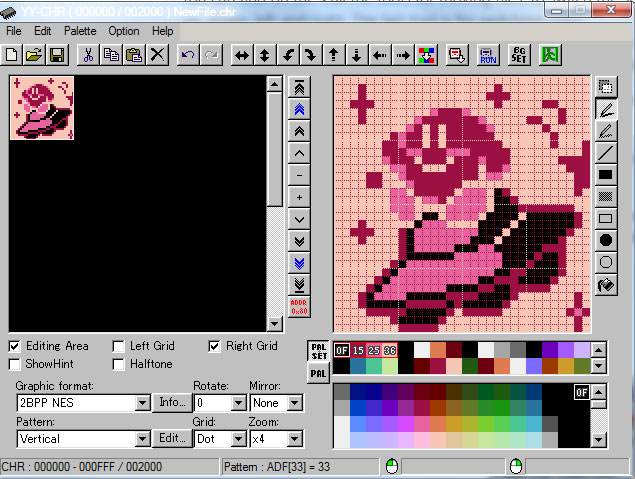
Here, you can this the result of this color replace.
Open & Save
You can already play to transform some sprites. You can pick up a NES ROM, it will be better if it's an illegal one. Then via YY-CHR go to open, pick-up the ROM file .nes and see what is on the YY-CHR. For example, I will take Super Mario Bros. You can transform as you want the tiles or to find all the palette color of Super Mario bros. You will have 2 pages of tiles if you scroll.
When you save, you need to be sure to not forget to add the extension .chr to our file. For example, click on „save under“ then you need to write your file’s name „WhatYouWant.chr“. You can go to „Palette“ and save it „Save Palette Set (*.pal)“. We will use it for the next Tool.
Nes Screen Tool
NesST is good to build one screen BG. If you want to make a bigger level with scrolling better to use another software like Tiled. I will show this software later. Let’s learn the basis. You can dowload NesST
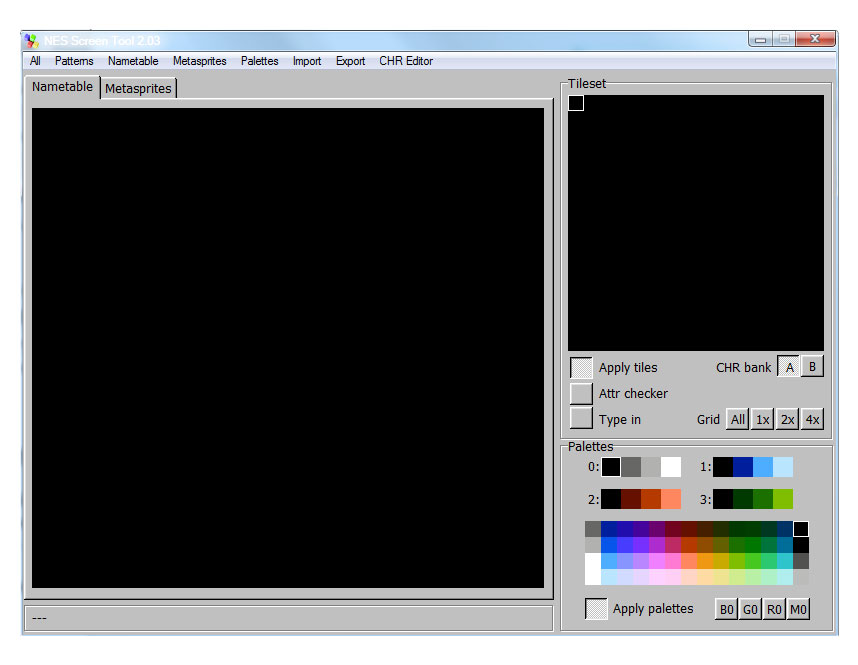
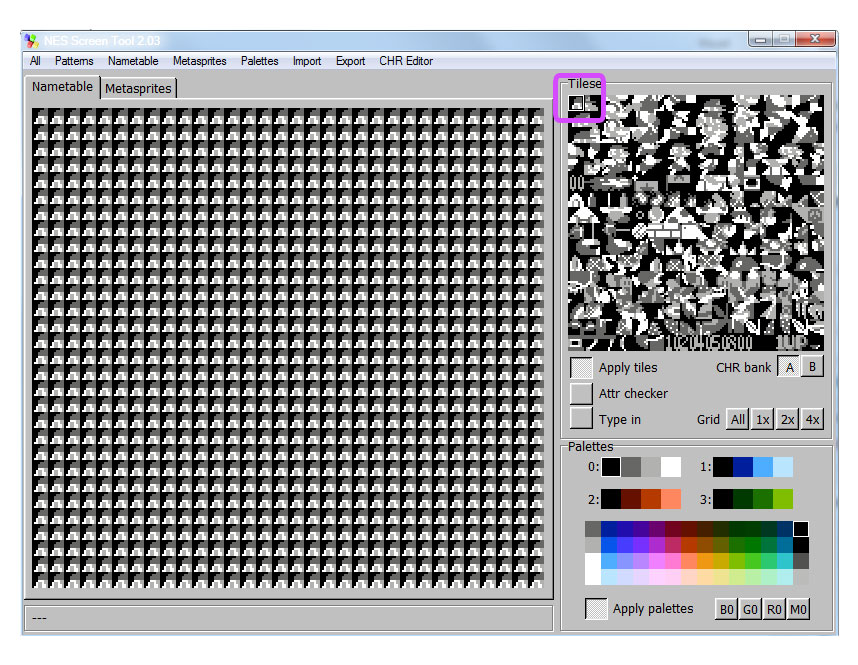
Install and open it. You will see this
Tools
Let’s see the tools of this software. On the left side will be the Nametable (your working-spaces).
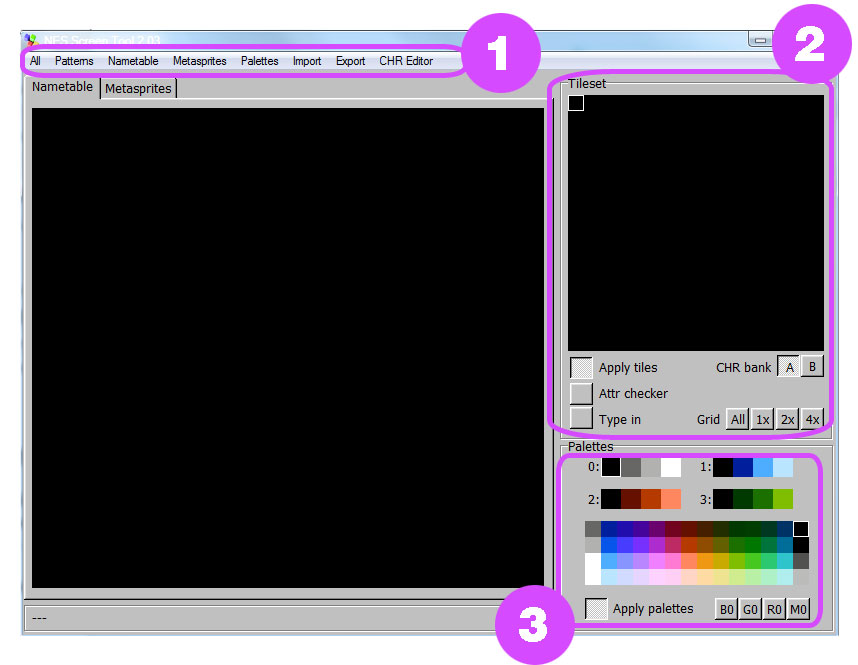
Area 1 will be for importing, saving, exporting differents stuff. You can have also a small CHR editor, pretty nice to correct small mistakes.
Area 2 is important, you can see the 2page of your CHR Bank,
- CHR bank, you need to choose between „A“ or „B“.Now you can understand why i prefer to set my CHR Bank in two, one part for Sprites the second one for BG. I can have all my BG tiles in a page to use it after on this Software.
- Apply tiles (normal) is to select tiles and add it on your Nametable to compose your BG.
- Attr. Checker is to see on your Nametable which palette you use.
- Type in is good if you see a tile not correct on your BG, select first the tile you want to change on your Nametable then choose on the Chr Bank the good one.
- If you double-click on a tile in the Tileset the CHR editor. You can correct or change the tile, you just need to select on the palette the color of the pixel you want to add.
Area 3 is the palette like in YY-CHR, but you have only 4 palettes.
Import chr & check rules
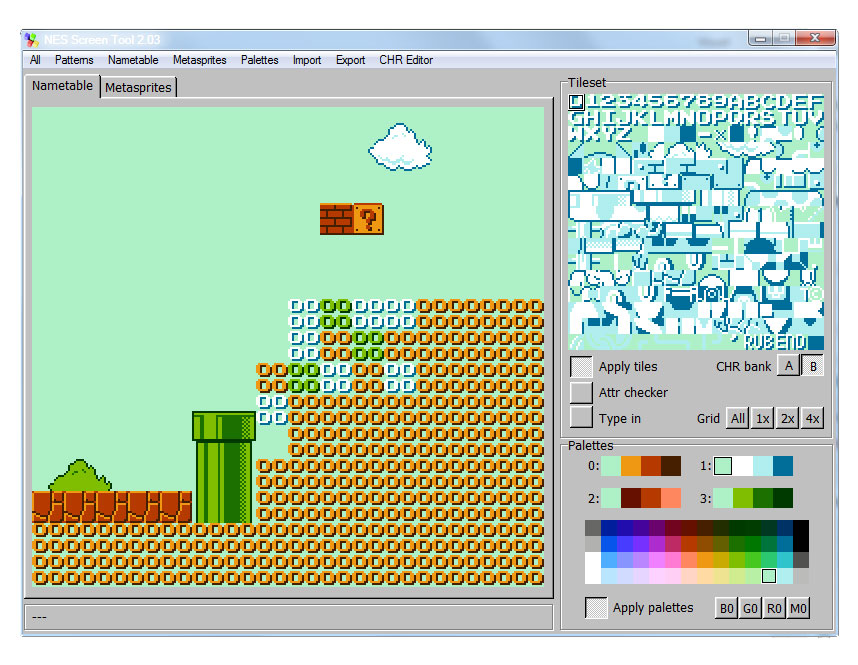
Go to All > Open, choose your new file „WhatYouWant.chr“. You will have this on your screen.
You see on your Nametable a lot of the same tiles, check on the Tileset and you will see the first tile who selected and fulfill all the page. Go to the menu on the area 1 Palettes > Open Palettes. Select the palette you save with CHR Bank. If not compose you own palette directly on NesST. Now you can switch the CHR Bank to „B“, select a palette and start to compose something. You will need to remember the different rules we saw before.
Metasprite
On the top, click the tab Metasprites. You will have access to your new working-space, the Metasprite. You can compose your sprites. It will be possible also to see an animation (fake).
![]()
To add tiles on the left side, you need to click-right and make a Drag & drop where you want on the Metasprite.
![]()
If you want to make another sprite, you can switch the Metasprite under. If you make many sprites, it will be possible to check fast an animation when you switch the metasprite under. Anyway, Adobe Photoshop is better for animation.
Export
You can save all directly when you go to > All or you can save each things. You can save individually
- the CHR ( chr bank)
- the Nametable (screen of BG)
- the palette (4 palettes)
- the Metasprite (different sprites)
You can also export your Nametable as a BMP file. It will be good to work with this format when we will use Adobe Photoshop.
1.3 NES GFX storage
NES GFX storage = CHR
We will see where we stock the graphics stuff for a NES game. CHR is Character data, the banks to stock you tiles for sprites and BG elements.
Prepare yourself because you will have only 8K (8192 bytes) that means 512 tiles. This time we will see the place we can use to stock our graphic data. We have a bank of 512 tiles. Normally the bank is separate in 2, each can contain 256 tiles.
Super Mario Bros use it like this:
- One bank is for the Sprites: Characters, enemies, effects, items…
- The second one is for the BG: Decorative element, letters, coins…
Personally i like this way to store the graphics. But you can mix all, nothing is fixed. You have 8K to store all what you want and decide after what will be a sprite or a BG element. You can use the same tile for both.
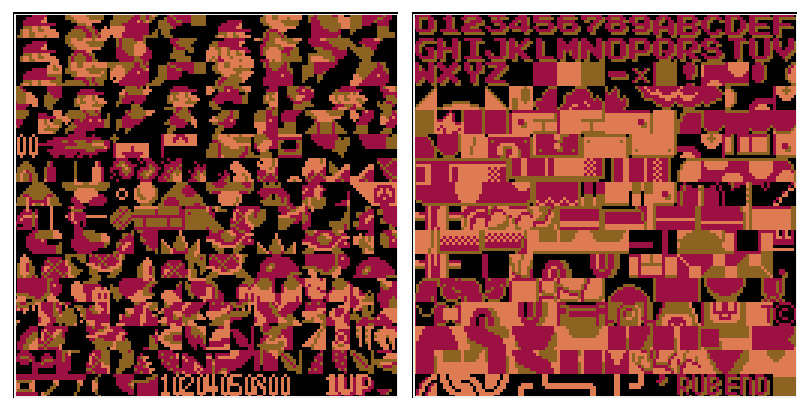
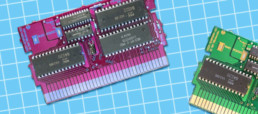
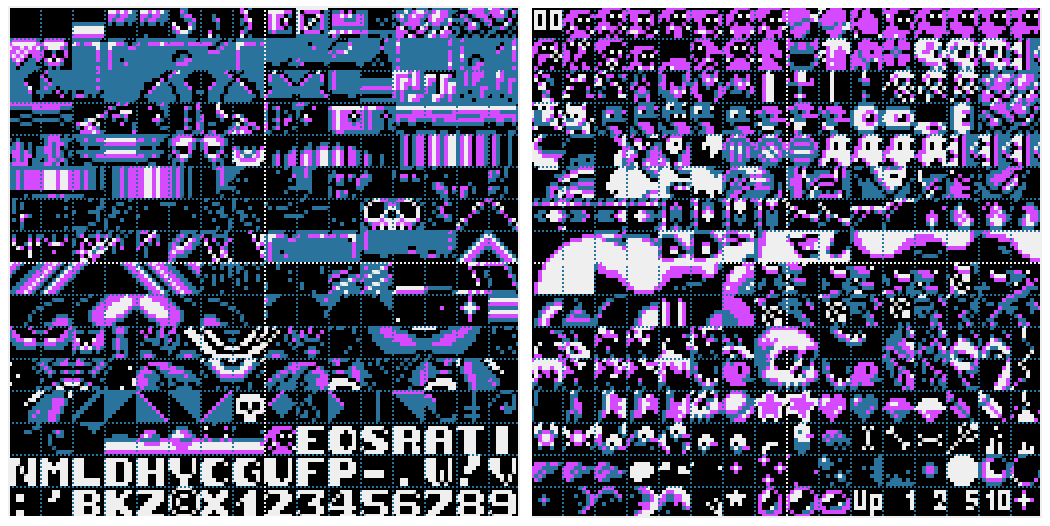
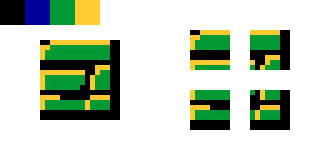
Have a look to the Banks of Super Mario Bros , left for sprites , right for BG elements.
Ok sorry, it’s again some limitation but people could make some games with this space. Look Super Mario bros, Donkey Kong. They are great! If your gameplay is nice and you feel blocked with this little space for graphics, think about a simple and minimalist graphics. What ever you can make, a nice gameplay will always by the basis of your game. Graphics are just here to make it nicer.
We will see after how to get more space for Graphics. To explain you and to make it simple (because it’s more complicated): you can only use this CHR bank per frame on a TV screen . So it will be necessary to update graphics and replace them to have more in some specific time. Different levels, enemies, extra-big boss etc. For the moment, we will concentrate ourselves only in this CHR bank.
The best thing is to create element that you can combine many times. It’s a very good exercise, to limit yourself to use only this chr bank for a game. Title screen, letters, levels, hero and enemies. During this Tutorial’s serie, i will use the management system of Super Mario Bros for CHR Bank. One bank for Sprite, the second one for BG. But you can make as you want for our project.
Sprites in CHR’s Bank
The bank are numbered in hexadecimal too. Starting from $00 (0) to $FF (255), the $ signs means it’s a value. And this value need to be store in an address. We will see this after in details. We are here to create graphics.
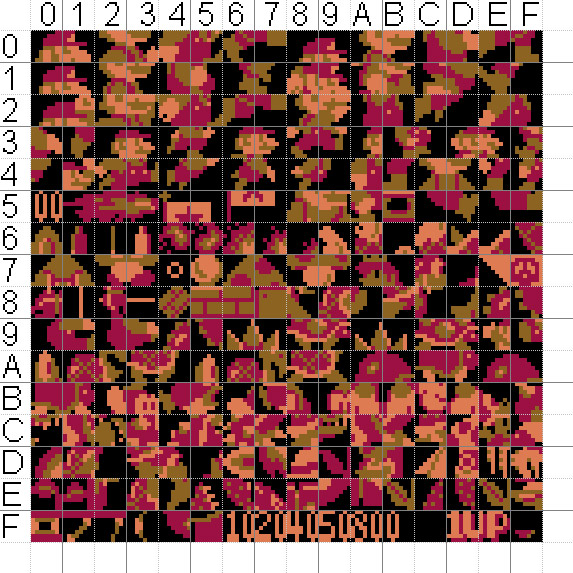
You can noticed the sprites are splitted, like slices. Why?… because Mario is bigger as one tile (8x8px), he is composed of many tiles sprites, many blocs of 2 tiles (8x16px). Many sprites are more bigger as 8x 16px, it’s necessary to separated in different parts and recompose it till you create your full-sprite on screen. we will take the first line of the sprite’s CHR bank (sprites).
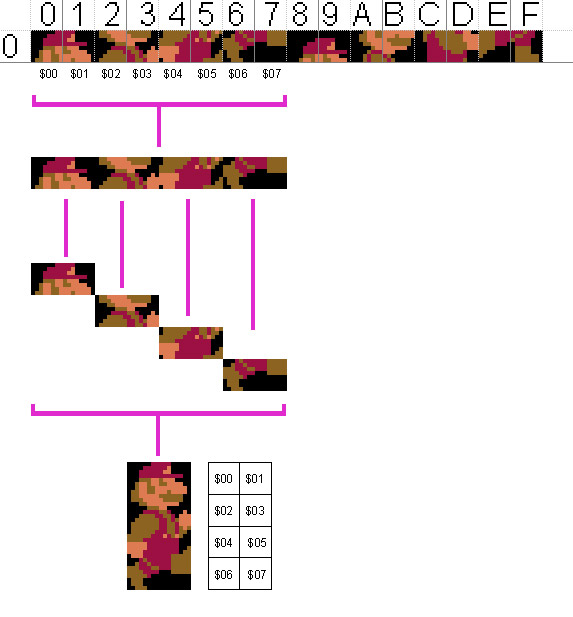
We will need to cut our sprites in this format (8x16px) to place it correctly in the CHR bank.
BG in CHR’s Bank
For the CHR bank for BG, you need to manage correctly the space. When you will start to make a game, don’t forget the place for letters, point and symbols you want to had on the screen. Better to let 3 line’s free for this and have space for sloving graphics problem.
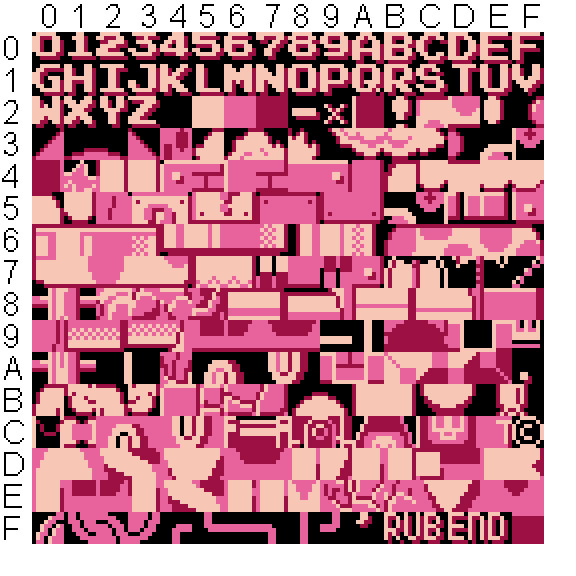
Like in Super mario, I prefer to let 3 lines empty. Even if you are working on BG elements, better to let this space since the beginning for letters, numbers, special characters, basic block colors. Here are the 3 first lines, the space from $00 to $2F:
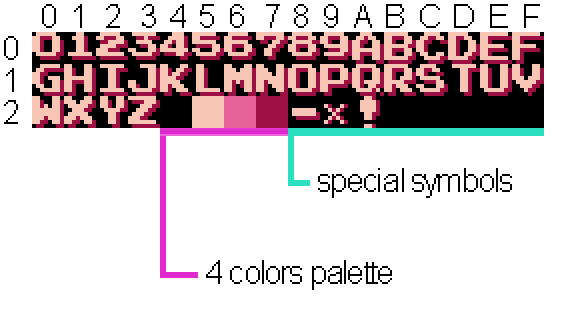
When will come the time to make texts or title screen and you will have this space, you will be glad. Everybody have his own way to manage this bank, so I guess you will find the best solution for your project.
For Micro Mages, we managed the CHR in a similar way. One part for the BG with 3 lines dedicated for letters/extra and the other part only for sprites. All the game GFX fit inside this space.
Thanks for reading! I invite you to read the next tutorial ;)
1.2 NES rules for BG and Sprite
Let’s see some NES rules!
Famicom/NES console have some rules for graphics. We are not here to make pixel-art but to find some solutions to make graphics that you can use for a NES/Famicom game. It’s harder to create NES GFX as to do pixel-art because we need to respect limitations. It was nice to see the palette's limitations but there is more limitation that we will need to take care of. The console have a specific system for graphics.
Background
To understand how the BG works, we need to analyse how it appears on a screen. The size is 256x240 px.
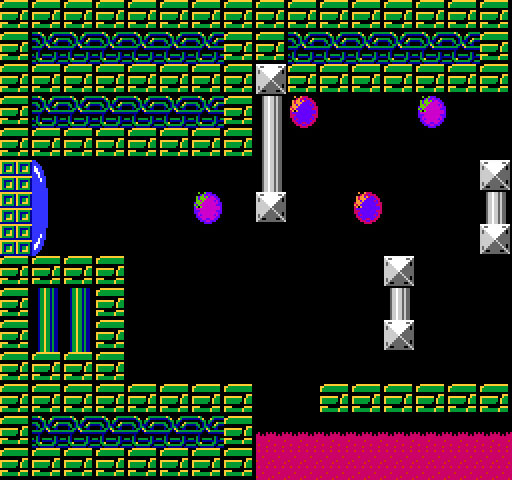
But for the US, the screen cuts out 8px top and down.
If you want to make a game with international intent it is better to design it for a size of 256x224 px
Here you can see the difference between PAL and NTSC (US) screen.
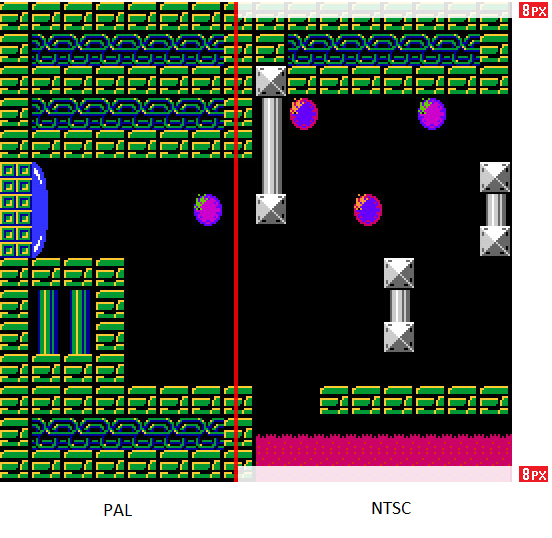
The Background is composed of Big Blocks like a grid. You have 16x15 big blocks and this is very important! Why? Because this big block of 16x16 px can use only one palette! All Graphics and design will be influenced by this simple rule. You can see already the structure of BG with few different tiles blocks.
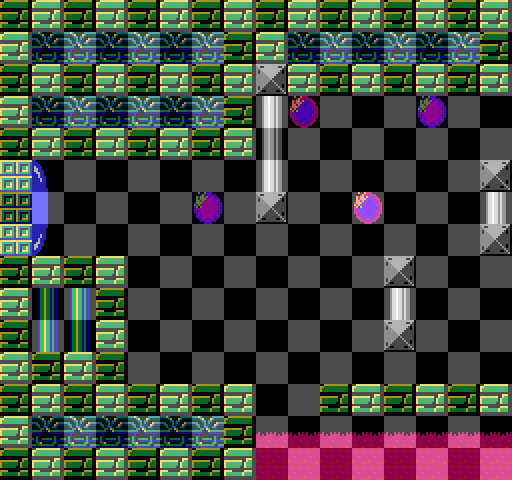
Now, you need to be attentive. One big block is composed of 4 tiles and uses only one palette of 4 colors.
Each block is 16x16 px. Each tiles is 8x8 px.
We will need to keep this rule in mind . We are lucky to have one color similar on each palette. it will be something useful, we will see it after. For the moment, we are done with the BG’s rules.
Sprite
Let’s see what happens with sprites.
The Main limitation is TV scanline. If you don’t understand, it's normal. Your TV, like all the old TV, put the image of console per line. Starting from top-left to the bottom-right. Line by line, from left to right. If you look closer your TV, you can see the how the "line of pixel" are display on top part of the screen.
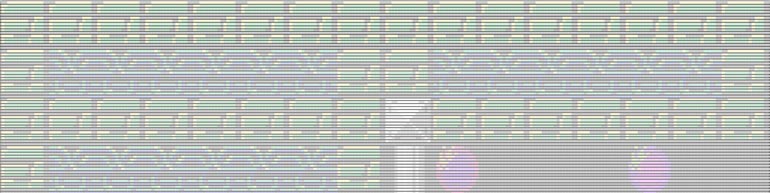
Now we will see more closer how the scanline works on top part of our screen. You need to keep in mind this is normally for full screen. The signal (in Pink/Purple) refresh the picture and when the full screen is load, the next frame will be load again from the top-left. This is very fast that your eyes can't catch it.

Here's a video that show the scanline on a real CRT, taking Super Mario Bros. as an example.
You are limited to 8 sprites per scanline. If you put 9 sprites, the last one will disappear. Developers found a solution for this: BLINKING SPRITE.
Everybody already saw some sprite blinking in a NES game . It was not a mistake, it was an extra-code to allow you to see more than 8sprite. And because the frame of screen go fast, it’s blinking.
For example we have 3 meta-sprites of Rabbit-Robotic. We will calculate the number of sprite per line.
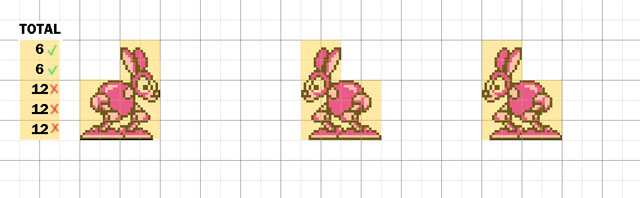
The solution is to code which sprites that need to disappear and which one need to appear at specific time. Each frame will show different sprites (respect the limitation of 8 sprites maximum).
Here we have 4 sprites to manage. (12 sprites-8 sprites limit= 4 sprites in excess). In one frame, the 4 last sprites disappear, in the second frame it’s the 4 sprites of the middle that disappear. Now we will see the blinking code in slow motion.
That’s it! It’s really boring because big sprites will always be something to solve.
Anyway, it’s not a problem because limitations force you to be creative! And we are here to find creative’s solutions ^^

1.0 Intro to NES Graphics
In this serie of tutorials, we will see how to create graphics for Famicom/NES games. It will be hard but funny.
Read more